Want faster internet in your home office? Tired of laggy gaming sessions? Hardwired ethernet connections blow Wi-Fi out of the water—we're talking consistent gigabit speeds instead of those "up to" promises from your router. Professional installers pocket $50–$150 per outlet, but here's the thing: if you can drill a hole and follow color codes, you can wire your own house. I'll show you exactly how, from picking the right cable to testing your finished connections.
Understanding Ethernet Cable Types and Specifications
Here's what actually matters when you're standing in Home Depot staring at cable boxes: Cat5e handles gigabit speeds just fine for runs under 328 feet. That's your wallet-friendly option—perfect if you're wiring a 2,000-square-foot house and don't need bleeding-edge speeds.
Bump up to Cat6 when you're drilling through walls you won't access again for a decade. Yeah, it costs 20% more, but it pushes 10-gigabit speeds across shorter distances. Think of it as insurance against ripping open drywall in 2028 when everyone's streaming 8K VR content.
The ethernet cable diameter changes based on what's inside. Your basic Cat5e measures about 0.20–0.24 inches across—roughly the thickness of a pencil. Cat6 grows to 0.23–0.28 inches because manufacturers twist the pairs tighter and beef up the conductors. Cat6a balloons to 0.35–0.40 inches once you add foil shielding around each pair.
Why does thickness matter? Try threading eight Cat6a cables through a 1-inch conduit and you'll find out fast. Cable diameter also determines your minimum bend radius—we'll get to that headache later.
Cat7 and Cat8 stuff? That's overkill unless you're building a data center. Both push past 0.40 inches in diameter because every single pair gets individual shielding. Your home network won't see any benefit from Cat8's 40 Gbps capability—your internet connection probably tops out around 1–2 Gbps anyway. Save your money.
Cable Category Specifications at a Glance
Category
Top Speed
Distance Limit
Diameter Range
Where It Makes Sense
Cat5e
1 Gbps
328 feet
0.20–0.24 inches
Apartments, rental properties, budget builds
Cat6
10 Gbps up to 180 feet, 1 Gbps full distance
180–328 feet
0.23–0.28 inches
New construction, media rooms, home offices
Cat6a
10 Gbps
328 feet
0.35–0.40 inches
Commercial spaces, future-proof residential
Cat7
10 Gbps
328 feet
0.40–0.45 inches
Industrial settings with interference issues
Cat8
25–40 Gbps
98 feet
0.40–0.50 in
Server rack connections, enterprise networking
One more critical distinction: solid-core versus stranded. Permanent wall installations require solid-core—the single copper conductor maintains signal quality across 300-foot runs. Stranded cable (where each conductor is actually multiple thin wires twisted together) gives you flexibility for patch cords between your wall jack and laptop. Never run stranded cable through walls. It violates building codes and performs terribly beyond 20 feet.
Tools and Materials Needed for Installation
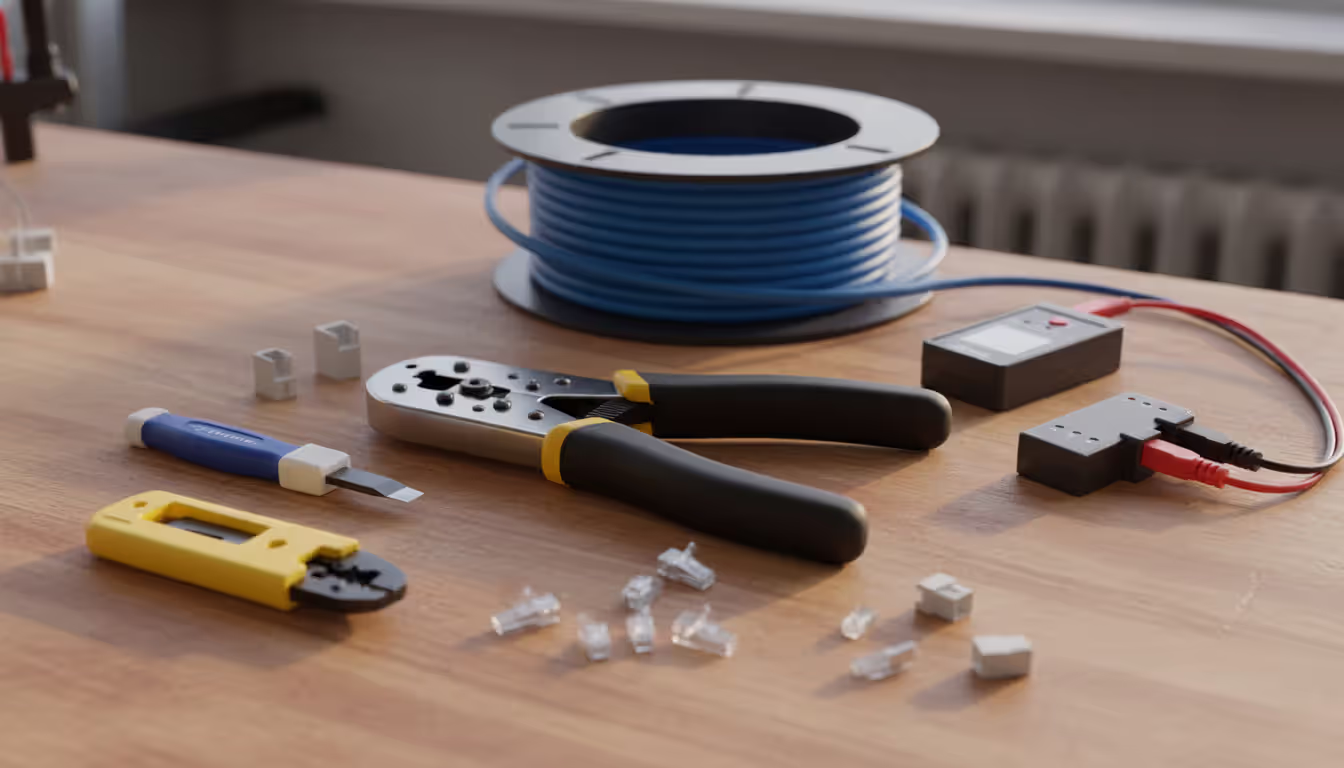
You'll drop $80–$150 assembling your toolkit, but these tools work across dozens of projects. Here's what actually matters:
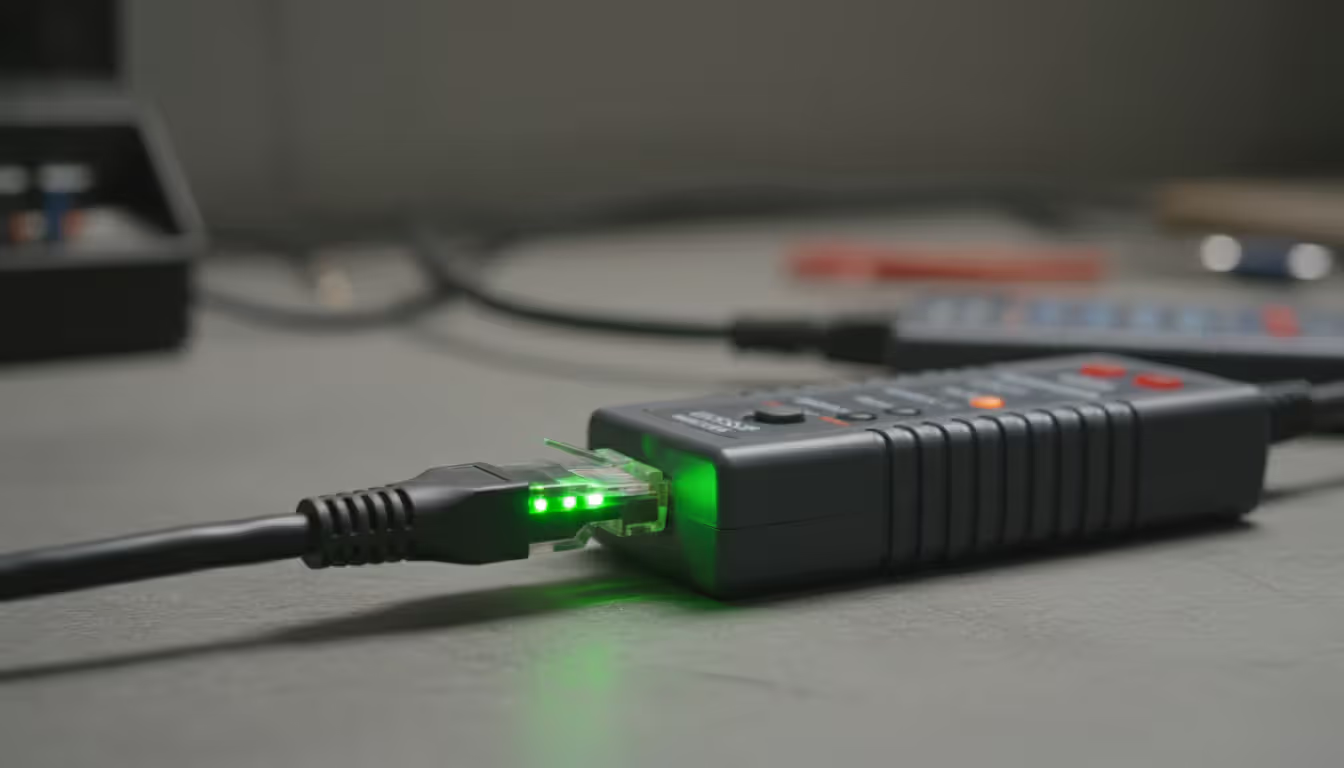
A cable tester separates success from frustration. Basic continuity checkers ($25–$40) confirm each pin connects—they'll light up eight LEDs in sequence if you wired correctly. Advanced models ($80–$200) tell you exactly how long your cable run is, spot split pairs, and identify which connector has the problem. Worth every penny if you're running more than five drops.
Crimping tools deserve your money. Those $12 Harbor Freight specials create connections that work Monday but fail Friday. Grab a ratcheting crimper ($20–$35) that applies consistent pressure. Get the pass-through style—you can verify wire order before committing to the crimp.
Dedicated cable strippers remove the outer jacket without nicking individual conductors. One tiny nick in a conductor causes weird intermittent failures that'll drive you crazy. Pair it with flush-cut snips for trimming wires perfectly even.
Punch-down tools seat wires into keystone jacks and patch panels. The 110-style blade cuts and seats simultaneously. Spring-loaded models save your hands when you're terminating 40 connections.
Fish tape or fiberglass rods pull cable through walls. Steel fish tape works great in existing walls; fiberglass rods shine in open stud bays. Glow rods with magnetic hooks make ceiling-to-wall transitions almost pleasant.
Stock up on consumables: at least 50 RJ45 connectors (you'll botch a few learning), keystone jacks matching your cable category, wall plates, rounded cable staples that won't crush your cable, and velcro ties. Buy a label maker—trust me, you'll thank yourself later when troubleshooting.
Author: Ethan Norwood;
Source: baltazor.com
Ethernet Cable Pin Configuration and Wiring Standards
Two wiring schemes dominate: T-568A and T-568B. Performance-wise? Identical. The difference is purely which colored wire lands on which pin. T-568B owns roughly 80% of US installations. Pick it unless you're matching existing work in your house.
Notice how pins 1, 2, 3, and 6 swap orange and green between standards? Pins 4, 5, 7, 8 stay identical. Both connector ends must follow the same standard—that creates a straight-through cable, which covers 99% of installations. Crossover cables (mixing standards on each end) were necessary before 2010 when auto-MDIX became universal.
Each ethernet cable pin assignment carries specific data. Gigabit ethernet uses all eight conductors: pairs on pins 1-2 and 3-6 transmit bidirectional data, while pairs 4-5 and 7-8 handle additional channels. Older 100 Mbps fast ethernet only needs pairs 1-2 and 3-6, but terminate all eight anyway—your next laptop will probably want gigabit speeds.
Here's what separates amateur work from professional: maintaining pair twist. Each pair twists at a unique rate—that's what cancels crosstalk between adjacent pairs. Untwist more than half an inch during termination and your signal quality tanks. Keep those twists tight right up to where conductors enter the connector.
Step-by-Step Ethernet Cable Setup Process
Planning Your Cable Route
Measure every run before buying anything. Start at your network switch location, trace to each destination, and add 20% for vertical climbs, detours around obstacles, and service loops at both ends. That 40-foot straight shot? Buy 50 feet of cable.
Scout for interference sources: fluorescent fixtures, electric motors, HVAC systems. Keep 12 inches away from electrical wiring on parallel runs, or cross power cables at 90 degrees. Shielded cable (F/UTP or S/FTP) tolerates closer proximity but costs 30–40% extra.
Building codes require plenum-rated cable in air-handling spaces—that's anywhere HVAC uses for airflow return. Plenum jackets resist fire spread and reduce toxic smoke. Most commercial dropped ceilings need it; residential codes increasingly mandate it. Vertical runs between floors need riser-rated cable. Standard PVC jackets work fine for non-plenum residential spaces.
Sketch your route or use a phone app. Mark stud locations, existing utilities, fire blocks. Always plan service loops—extra cable coiled near endpoints lets you re-terminate mistakes without pulling new runs.
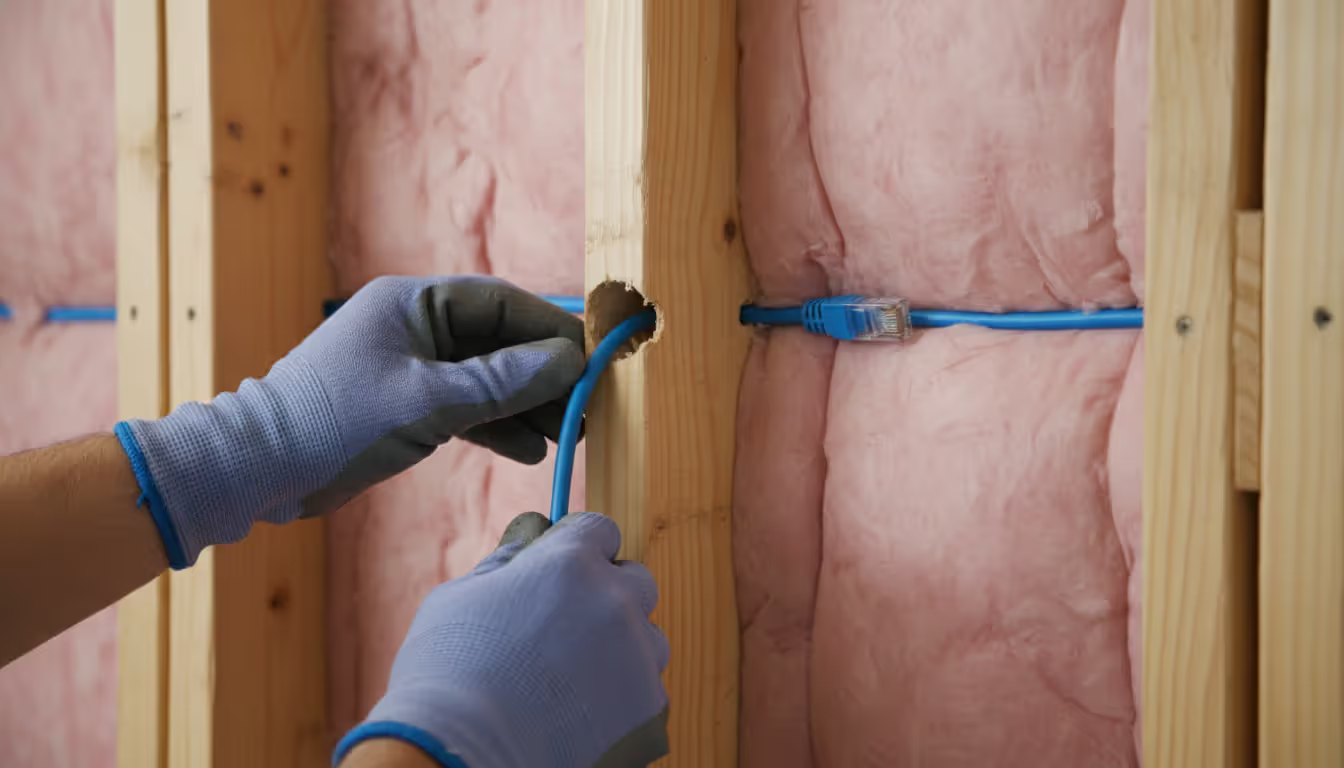
Running Cable Through Walls and Ceilings
Drill 3/4-inch holes centered in wall plates and studs—keeps future drywall screws from puncturing your cable. Angle holes slightly upward to prevent sagging. A 54-inch flexible drill bit punches through multiple studs from one access point, saving hours compared to drilling from both sides.
Feed cable gently. Yanking stretches conductors, creating impedance mismatches that show up as intermittent packet loss. Cat6 maxes out around 25 pounds of pulling tension. Long conduit runs benefit from cable lubricant, especially with multiple 90-degree bends.
Secure cable every 4–5 feet using rounded staples or J-hooks. Pointed staples pierce jackets and short conductors against each other. Leave slight slack between mounting points—temperature swings cause expansion and contraction.
Minimum bend radius equals eight times your cable diameter. For typical 0.25-inch Cat6, that's a 2-inch radius. Tighter bends separate pairs internally and create signal reflections. Use corner guards or bend supports for right-angle turns.
Label both cable ends immediately. Running everything before terminating prevents mix-ups and speeds installation. Leave 12–18 inches protruding from wall boxes—gives you working room plus future service capacity.
Author: Ethan Norwood;
Source: baltazor.com
Terminating Cables and Testing Connections
Strip 1.5 inches of outer jacket using your cable stripper's depth guide. Check for nicked conductors—even tiny cuts cause failures under network load. Untwist pairs only enough to arrange them correctly, keeping twists within half an inch of the connector.
For keystone jacks, color-coded labels show both T-568A and B patterns. Seat each wire into its slot, then punch down at 45 degrees. The blade seats the wire and trims excess in one motion. Tug gently on each wire to verify retention.
RJ45 plugs require arranging wires in pin order, then trimming to 0.5 inches past the jacket. Slide wires fully forward—each should reach the connector's front edge. The jacket must enter the connector body; crimping only conductors creates weak points that fail when someone trips over your patch cord.
Test everything before closing walls. Basic testers should light all eight LEDs in sequence. Advanced models display cable length and catch split pairs (right pins connected but wrong pairs used). If a 100-foot run shows 150 feet, you've got crossed pairs creating signal loops.
Verify network connectivity by plugging into your switch and checking link speed. Gigabit connections should autonegotiate to 1000 Mbps. Dropping to 100 Mbps signals wiring errors or damaged conductors. Intermittent dropouts point to loose terminations or excessive untwisting.
Common Installation Mistakes to Avoid
Over-cinching cable ties crushes internal pairs and creates impedance discontinuities. Use velcro straps or leave zip ties loose enough to slide slightly. This mistake manifests as intermittent packet loss rather than total failure—makes troubleshooting infuriating.
Mixing solid and stranded cable creates impedance mismatches. Patch panels and wall jacks expect solid conductors; punch-down connections with stranded wire work initially but fail within months. Conversely, repeatedly flexing solid-core patch cables breaks conductors—they're not designed for movement.
Ignoring cable diameter during conduit planning violates NEC and makes future expansion impossible. Code allows 40% conduit fill for three-plus cables. A 1-inch conduit comfortably holds six Cat6 cables; forcing eight damages jackets during installation and guarantees certification failures.
Splitting pairs destroys crosstalk cancellation. This happens when installers ignore the ethernet cable connection diagram and grab random wires. Basic connectivity tests pass but gigabit speeds fail completely.
Skipping service loops saves two feet of cable today but costs hours during future maintenance. Always coil 3–5 feet in accessible locations—attics, basements, network closets.
Running parallel to electrical wiring induces noise, especially near dimmer switches and motor circuits. Cross power lines perpendicularly, or keep 12 inches away on parallel runs shorter than 10 feet.
Author: Ethan Norwood;
Source: baltazor.com
When to Hire a Professional Ethernet Cable Installer
Large-scale projects justify professional help despite higher upfront costs. Structured cabling systems with 20+ drops, patch panels, and cable management demand experience to maintain organization and performance. Certified installers document everything and provide testing reports—essential for commercial properties and increasingly expected in high-end homes.
Many jurisdictions require licensed contractors for low-voltage work, particularly commercial buildings. Violating licensing requirements creates liability exposure and complicates property sales. Check your local building department before tackling projects beyond a few simple runs.
Experienced ethernet cable installers finish work faster and cleaner than DIY attempts. They own specialized certification equipment ($2,000–$5,000) verifying installations meet Category specifications. Certification matters for commercial spaces and home offices where network downtime affects revenue.
Time versus complexity trade-offs favor professionals when working in finished spaces with limited attic or basement access. They've fished cable through insulated walls and navigated fire blocks hundreds of times—no exploratory drywall cuts needed.
Commercial projects involving fiber optic backbones, PoE planning for cameras and access points, or integration with existing structured cabling definitely need professional oversight. These installations involve electrical load calculations, grounding requirements, and network architecture beyond typical DIY scope.
Most DIY failures I encounter aren't from bad crimps—planning kills projectsюHomeowners run cable first, then discover they needed conduit for future expansion, or they violated bend radius squeezing through tight spaces. Two hours planning prevents ten hours reworking installations
— Marcus Chen
Frequently Asked Questions About Ethernet Cable Installation
What gauge wire is used in ethernet cables and why does diameter matter?
Standard ethernet cables use 24 AWG solid copper conductors. Premium Cat6a sometimes bumps up to 23 AWG for better long-distance performance. Wire gauge directly affects overall cable diameter—thicker conductors plus shielding layers grow diameter from 0.20 inches (basic Cat5e) to 0.40+ inches (shielded Cat6a). This impacts conduit fill calculations, stud hole sizing, and bend radius requirements. Thicker cables weigh more too, creating higher pulling tension during installation through long conduit runs.
Can I install ethernet cable myself or do I need a licensed installer?
Residential installations with a few drops rarely need licensed contractors, though codes vary by location. Most areas treat low-voltage residential cabling as homeowner-friendly work. Commercial buildings almost always require licensed contractors. Check your local building department—some municipalities require permits even for residential projects. Complex installations involving plenum spaces, fire-rated barriers, or security system integration benefit from professional work regardless of legal requirements.
What's the difference between T-568A and T-568B wiring?
Both standards specify which colored wire lands on each RJ45 pin. They differ only in orange and green pair positions—T-568B swaps these compared to T-568A. Network performance is identical; consistency within your installation matters more than which you pick. T-568B dominates US residential and commercial work (roughly 80% market share). Match your standard on both cable ends for straight-through connections. Mixing standards creates crossover cables, which modern equipment doesn't need thanks to auto-MDIX.
How do I test if my ethernet cable installation is working correctly?
Begin with a basic continuity tester ($25–$40) checking all eight pins. LEDs should illuminate sequentially 1–8. Connect your cable to a network switch and confirm the link LED lights up. Check connection speed in your computer's network settings—should read 1000 Mbps for gigabit links. Run an internet speed test confirming throughput matches your service tier. Professional cable certifiers ($2,000+) measure length, crosstalk, and return loss verifying Category compliance, but that's excessive for typical residential work.
What is the maximum length for an ethernet cable run?
IEEE 802.3 standards specify 100 meters (328 feet) maximum for all twisted-pair categories from Cat5e through Cat8. This includes patch cables at both ends—running 295 feet through walls leaves only 33 feet for patch cords. Beyond this distance, signal attenuation and timing issues trigger packet loss and connection drops. Longer distances require fiber optic cable or installing a network switch as a repeater at the halfway point. PoE devices may need shorter runs depending on power draw.
Do I need to follow building codes when installing ethernet cable?
Absolutely, though enforcement varies between jurisdictions. National Electrical Code Article 800 governs communication circuits including ethernet. Key requirements: proper support spacing (every 4.5 feet), separation from electrical wiring, plenum-rated cable in air-handling spaces, and fire-stopping through fire-rated assemblies. Many areas require permits for commercial work while exempting simple residential installations. Homeowner's insurance may deny fire damage claims caused by improper low-voltage work. Following NEC guidelines protects property value and safety regardless of local enforcement.
Hardwired ethernet connections deliver measurable benefits—consistent low latency, rock-solid reliability, and full-speed network performance without Wi-Fi congestion. Most residential projects fall within DIY capabilities once you grasp cable categories, wiring standards, and proper installation techniques. Cut your teeth on a single practice run before tackling whole-house installations.
Quality tools and materials pay dividends across multiple projects. Proper planning prevents 90% of failures—measure carefully, pull gently. Test every connection before closing walls, and document cable routes for future maintenance.
Complex commercial projects or whole-house structured cabling warrant professional installers who provide expertise, certification, and warranty protection justifying the additional expense. Regardless of approach, properly installed ethernet infrastructure adds real property value and supports increasingly bandwidth-hungry applications through 2030 and beyond.
Virtual desktop infrastructure represents a fundamental shift in how organizations deliver computing resources. Learn about VDI architecture, deployment models (on-premises, cloud, hybrid), implementation costs, use cases, and how to select the right solution for remote work and centralized management needs
Network administrators who rely on hourly snapshots discover problems only after users complain. A real time network traffic monitor shows what's happening at this exact moment—every packet, every connection, every anomaly as it occurs. Learn how these systems work and how to implement them effectively
Public cloud storage has become the backbone of modern data infrastructure, powering everything from smartphone photo backups to enterprise disaster recovery systems. Learn how it works, key benefits and limitations, security considerations, and how to choose the right provider for your needs
Choosing between on-premise and cloud infrastructure affects budget, security, compliance, and agility. Understand cost structures, security trade-offs, and migration planning to make informed decisions aligned with your business requirements and strategic goals
The content on this website is provided for general informational and educational purposes only. It is intended to explain concepts related to cloud computing, computer networking, infrastructure, and modern IT systems.
All information on this website, including articles, guides, and examples, is presented for general educational purposes. Technology implementations may vary depending on specific environments, business needs, infrastructure design, and technical requirements.
This website does not provide professional IT, engineering, or technical advice, and the information presented should not be used as a substitute for consultation with qualified IT professionals.
The website and its authors are not responsible for any errors or omissions, or for any outcomes resulting from decisions made based on the information provided on this website.